| 1a. Prepare the Memory Stick / CompactFlash card / MicroDrive media. | 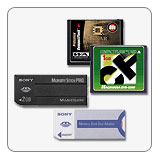 |
| Ensure that the Memory Stick with capacity of 16MB or more (Memory Stick Pro / Memory Stick Duo / Memory Stick Pro Duo) / CompactFlash card / MicroDrive media to be used is blank and recently formatted with the DSC-R1 camera. |
| 2. Prepare the AC adaptor and USB cable. | |
| 2a. Check the AC adaptor. | 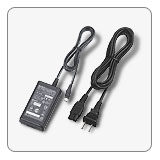 |
| Confirm that the Cyber-shot camera is fully powered by the AC-L15 series AC adapter plugged into a working power outlet. | |
| 2b. Check the USB cable. | 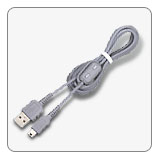 |
| Confirm
that the USB cable supplied with the camera is used.
Operations are not guaranteed if using a commercially available USB cable. |
|
Warning: 1)
Do not update the firmware using the supplied battery (NP-FM50).
The camera may render inoperable if the power fails during this
update.
|
There are 3 ways to copy DSCR1V2.ASH file to the Memory Stick / CompactFlash card / MicroDrive media, please select from below.
- Insert a formatted Memory Stick
with
capacity of 16MB or more Memory Stick Pro / Memory Stick Duo / Memory Stick Pro Duo media into the Memory Stick Slot/Adapter on the computer.
- Copy the DSCR1V2.ASH file from the computer onto the Memory Stick.

- Insert
a formatted Memory Stick media
into the camera.
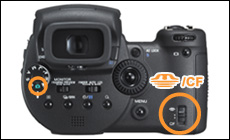
Set the
 /CF
switch to .
/CF
switch to .
- Connect
the AC Adaptor to the camera.
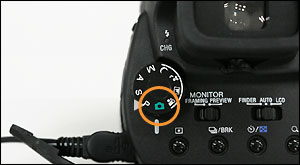
- Set
the mode dial to
 (Auto adjustment mode), and turn on the power.
- Press
the MENU button to display the menu. Move the multi-selector
rightward to
 [Setup], and move it further rightward
- Move
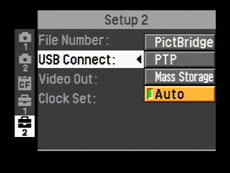
the multi-selector downward in the Setup screen to select Setup 2.
- In
the Setup 2 screen, set USB Connect to Auto.
- Connect
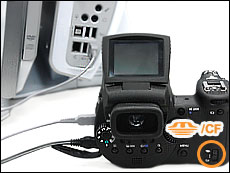
the camera to the computer with the USB cable.
- Copy
the update file DSCR1V2.ASH to the Memory Stick inserted in the
camera.
- When copying is finished, disconnect the USB cable.

- Insert
a formatted CF card or Microdrive, and set the /CF
switch to CF.
- Connect
the AC Adaptor to the camera.
- Set
the mode dial to
(Auto adjustment mode), and turn on the power.
- Press
the MENU button to display the menu. Move the multi-selector
rightward to
[Setup], and move it further rightward
- Move
the multi-selector downward in the Setup screen to select Setup 2.
- In
the Setup 2 screen, set USB Connect to Auto.
- Connect
the camera to the computer with the USB cable.
- Copy
the update file (DSCR1V2.ASH) to the CF card or Microdrive inserted in
the camera.
- When copying is finished, disconnect the USB cable.

To update the
firmware onto the Camera,
1. If the camera is connected to the computer with the USB cable, disconnect the USB cable.
2. Insert the Memory Stick / CompactFlash card / MicroDrive media containing the update file (DSCR1V2.ASH) into the Camera.
1. Connect the AC-L15 AC adaptor to the DSC-R1 camera to use as power source.
2. Set the mode dial
to ![]() (Auto adjustment mode) before turning on the power.
(Auto adjustment mode) before turning on the power.

The menu appears.
Move the multi-selector rightward to select ![]() Setup.
Setup.
The Setup screen appears.
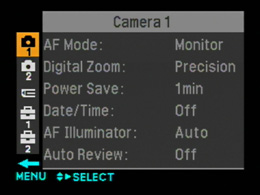
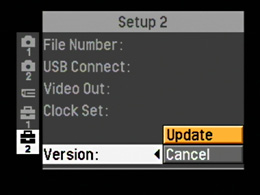
Move the multi-selector
downward to select Setup 2 in the Setup screen. When the Setup 2
screen appears, confirm that "1" is displayed in Version.
If Version is not displayed, turn off the power and redo the
procedure from
Step
4. Set
to the update mode
* If "2" is displayed in Version, this update is not required.
* Regardless of the display in Version, this update has already been implemented to the cameras with a serial number unlisted in the applicable serial numbers. You do not need to update the firmware for those cameras.

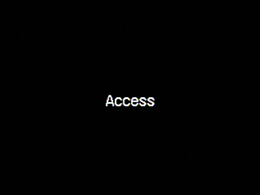
1. Select
Update, at the Version menu.
A black screen will
appear stating Access.
| NOTE: If an error occurs, please refer to the corresponding Solution. |
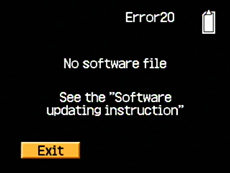
| 1.
Error 20: No software file
If an error message Error 20 - No software file appears, this could be caused by DSCR1V2.ash update file was not found on the Memory Stick / CompactFlash card / MicroDrive media. To resolve this, return to Software Updating Instructions and follow the steps to copy the file over to the Memory Stick / CompactFlash card / MicroDrive media. |
 |
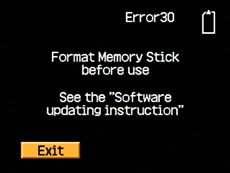
| 2a.
Error 30: Format Memory Stick before
use
If an error message Error 30 - Format Memory Stick before use appears, this could be caused by the existence of other files or folders in the Memory Stick. To resolve this, follow the instructions that came with your Cyber-shot to format the Memory Stick. Then return to Software Updating Instructions and follow the steps to copy the file over to the Memory Stick. |
 |
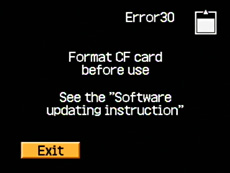
| 2b.
Error 30: Format CompactFlash before
use
If an error message Error 30 - Format CompactFlash before use appears, this could be caused by the existence of other files or folders in the CompactFlash card. To resolve this, follow the instructions that came with your Cyber-shot to format the CompactFlash card media. Then return to Software Updating Instructions and follow the steps to copy the file over to the CompactFlash card. |
 |
| 3.
Error 40: Invalid file
If an error message Error 40: Invalid file appears. The contents of the file in the Memory Stick / CompactFlash card / MicroDrive media are invalid, its version is not newer than the original version, or the firmware is for a different model. To resolve this, check the firmware version of the Cyber-shot and download the correct firmware. Then redo the procedures from Software Updating Instructions. |
 |
Please contact the nearest Sony service center if after following the instructions, the error occurs again.
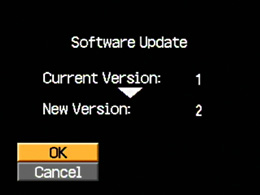
To
check the Current and the New Version.
1.
Confirm the versions listed next to Current and New, at the Software
Update version screen.
2. Select OK, to continue with the
firmware update.
Note:
If Cancel is selected, the Setup screen appears again.
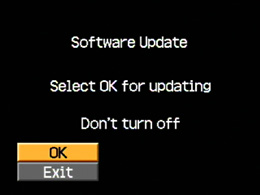
1. Select OK, if the
updated version is correct.
(It will take a few minutes (approximately
1.0 minute) for the firmware to update complete.)
Note:
If Exit is selected, the Setup screen appears again.
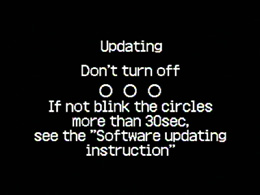
As the firmware update installs, the circle signs will begin to blink and then turn on one-by-one. Once all three circles are lit, the update is finished.
|
|
Blinking
PICTURE |
| If the following errors occur. |
|
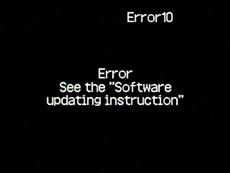
1. If the circles signs are not fully lit and do not blink for over 30 seconds, this could be cause by the update has failed. 2. If an error message Error 10: Error appears, this could be caused by the update has failed.
Solution: Please contact the nearest Sony service center |
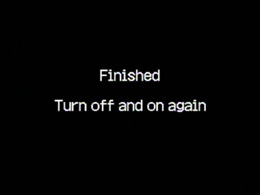
To complete the firmware update, push the RESET button using a sharp-pointed object.

Note:
During this reset, the camera must be in OFF mode.
When you press the RESET button, settings other than Video Out will return to the default settings. To restore those settings, please set them again. Please note that the file number of images to be recorded will also be reset. If you have recorded images with File Number set to Reset, new images to be recorded may have the same file numbers as the images previously recorded. In this case, please be careful not to overwrite the previous images when transferring the new images to the computer.
Please click here for the settings to be reset by pressing the RESET button.
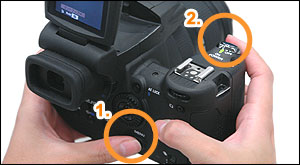
1. Turn on the
power while pressing and holding the MENU button (1)
for
longer than 2 seconds.
When the "Cyber-shot" screen disappears, release the MENU
button.
* Please use the AC Adaptor as power source when turning on the power.

The menu is displayed after you set the clock.
Move the multi-selector rightward to
Move the multi-selector downward to select [Setup
2] in the Setup screen.
Check if the version is updated.
If the version has successfully been updated, format the Memory Stick / CF
card / Microdrive.
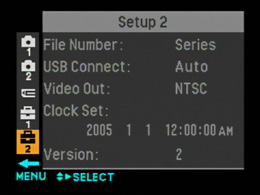
Check the
version
To check the version in
the Cyber-shot.
1. Select Setup 2, at
camera screen.
2. Confirm the version listed is 2, at
the Setup 2 screen.
Note:
If the current version
listed is lower than, and not "2", it may be necessary to download and
install the firmware update utility again.

The installation of the
DSC-R1 Cyber-shot Camera
Firmware Update is now complete.
Thank you for upgrading the
firmware.
Format the Memory Stick Duo / Memory Stick Duo Pro / CompactFlash card MicroDrive media after completion of firmware update.